Microsoft ATP Deployment for Mac OS


Here I am explaining to Install Windows ATP for the Mac OS through Intune MDM Solutions.

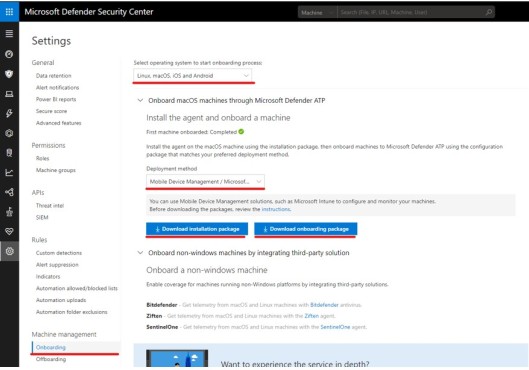
For doing that we need to download the Mac OS Onboarding package from the Security center portal.

https://secuirtycenter.windows.com

Access the Microsoft Defender Security Center and gather the installation and onboarding package

To deploy the installation package with Microsoft Intune we need the Intune app wrapping tool for macOS which is available here.


Now you should have these three files:

Microsoft Defender ATP source files

Please copy in one folder form the Mac Downloads folder.

Open a terminal and perform the following actions:

  • Make the IntuneAppUtil executable: chmod +x IntuneAppUtil
  • Generate the Intune deployment package: ./IntuneAppUtil -c wdav.pkg -o . -i “com.microsoft.wdav”
  • Unzip the onboarding package: unzip windowsDefenderATPOnboardingPackage.zip
  • we’ll need the files in the unzipped intune folder later

    When you have successfully completed the above steps, the file structure should look like this

Wrapped and unzipped Microsoft Defender ATP files

Intune portal configuration

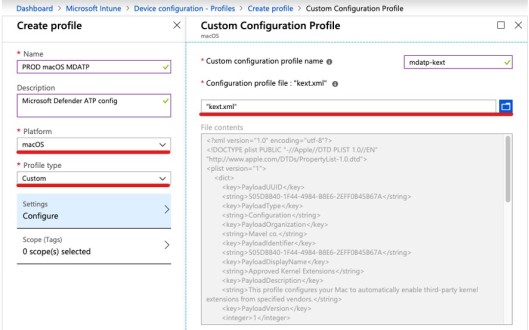
In the Intune portal create a custom device configuration to deploy the Microsoft Defender ATP kext.xml (kernel extension). Upload the kext file from the previously extracted zip file which is located in the Intune folder. These kernel extensions will be loaded into the macOS operating system on boot for the Microsoft Defender ATP service.

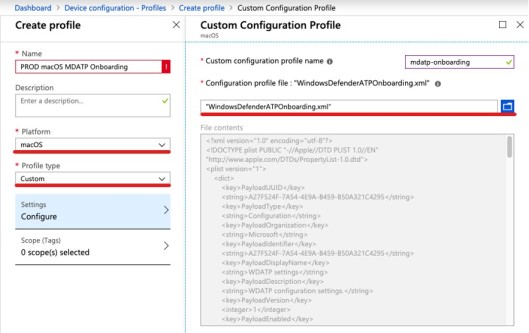
For the actual onboarding of the macOS machine to your MDATP tenant we need the onboarding configuration “WindowsDefenderATPOnboarding.xml”  which contains encrypted tenant info.  You find the file also in the unzipped  package in the Intune folder. To deploy this file create another custom device configuration and upload the xml file.

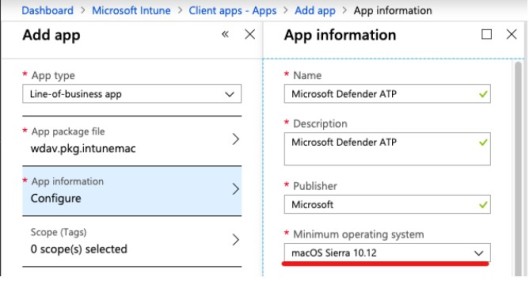
To deploy the  Microsoft Defender ATP package create a new LOB (Line-of-business-app) and upload the wrapped *.intunemac file:

Provide the required app information and make sure to set the minimum operation system version to Sierra as mentioned in the prerequisites:

Please make sure that you assign both device configurations and the LOB app to your targeted Azure AD group.

Microsoft Intune Device Categories using for App Deployments

Tags

,


Microsoft Intune Device Categories

In this blog post, I am going to cover how to use Device Categories in Microsoft Intune.  Device Categories can help with managing devices using Microsoft Intune and Azure Active Directory. This post will build upon my last two blog post on Dynamic Groups – https://blogs.technet.microsoft.com/pauljones/2017/08/28/dynamic-group-membership-in-azure-active-directory-part-1/

I will document (with screen shots) the following steps:

  • Create Categories in Microsoft Intune
  • Create Dynamic Groups based on the Categories
  • Deploy Policies and Apps to Dynamic Groups


Create Categories in Microsoft Intune Console (Azure Portal)

The first step is to create Categories in the Intune Console (Azure Portal).

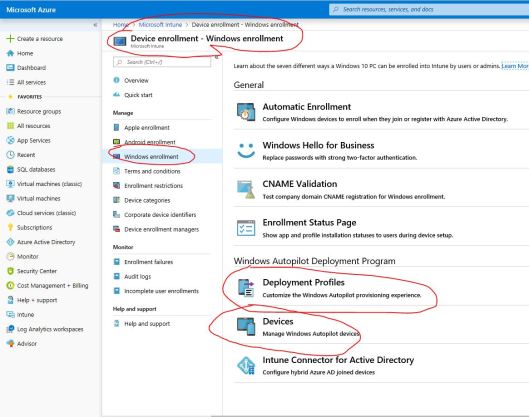
Launch Azure Portal – https://portal.azure.com and navigate to the Intune Blade.  Once in the Intune Console, navigate to Device Enrollment and select Device Categories.  Click + Create,  enter a Name for the Category, then click on the Create button at the bottom of the page.

In the screen shot below, it shows where I created 4 different Categories: Virtual Machines, iOS Devices, Android Devices and Physical Machines.  I will focus on managing Windows 10 Virtual Machines in this post.


Now that we have the Device Categories created in the Portal, we will now move create a Dynamic Group using Azure Active Directory.


Create Dynamic Groups based on Device Category

From the Azure Portal, select the Azure Active Directory blade – choose Users and Groups – select All Groups.  This will list all the current Security and Office Groups.


At the top of the blade, click + New Group to create a New Group. Enter a Name – I used Windows 10 Virtual Machines for this example.  Choose Membership Type – Dynamic Device and finally select Dynamic Device Members – Add dynamic query. Now it is time to add the dynamic membership rule – Under Add Devices Where select the following: deviceCategory Equals then type in Virtual Machines.


With those 2 steps: Create Device Category, then Create Dynamic Group, we will now be able to deploy Apps and Polices to devices based on Categories.

Now the final step is to deploy Apps and Policies to Dynamic Group.


Deploy Apps and Policies based on Device Category

I will not document the steps to create a Configuration Profile, but I will share a screen shot where I deployed Device Configuration Profile (Windows Defender Firewall) to the Dynamic Group (Windows 10 Virtual Machines) which is based on the Device Category (Virtual Machines).


The next screen shot will display deploying an Application  (Azure Information Protection) to the same Dynamic Group (Windows 10 Virtual Machines).


This concludes my blog post on using Device Categories with Microsoft Intune and Azure Active Directory to help better manage devices.

Courtesey- https://blogs.technet.microsoft.com/pauljones/2018/01/10/microsoft-intune-device-categories/


Autopilot Powershell script for getting Hardware ID


 “How to retrieve the hardware ID”, please see the below information, I have gather detailed steps for you to clarify this process.

Registering a device to your organization:


Every device [Including Virtual Machines] have a hardware ID and this is what needs to be registered in the Microsoft Cloud. It lets our cloud service know a device is registered to an organization think of it like an asset tag connected to the cloud. When the Auto Pilot service detects a registered hardware ID it connects it to the right Azure AD tenant and all the  pre-configured settings start flowing down to the client machine.

Microsoft is working with hardware vendors so that in the future companies purchasing devices can have the vendors Pre-register the devices before they even get delivered to the company purchasing them. For this exercise we’ll be using a PowerShell script to extract the hardware ID and uploading it into the Cloud.


The PowerShell Command I’m running can be found here
https://www.powershellgallery.com/packages/Get-WindowsAutoPilotInfo/1.1/DisplayScript


Now I’m going to walk you through the setup of a Windows 10 machine which is registered in my organization and is configured to be enrolled through Windows Auto Pilot. There are two stages I’ll show you.

  1. The first is getting the hardware ID extracted using the PowerShell command.
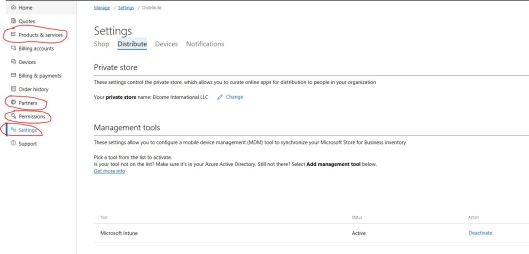
  2. The second is getting the hardware ID into the cloud service through Windows Store For Business [WSFB]
  3. The final stage is turning on the machine and seeing if it works.

EXTRACT HARDWARE ID

Since we are doing this manually we’ll have to extract the hardware ID using a PowerShell script. You want to install the Script on your Windows 10 machine from an elevated Powershell Prompt using this command


PS> Install-Script -Name Get-WindowsAutoPilotInfo


You might get a bunch of prompts depending on if you have done this before talking about running unsigned scripts and having the right permissions. I said yes to everything but this is a demo machine so there are no consequences to doing so. Make sure you are not breaking any organizational policies.

If you run the command and all goes well the script will be in this location
C:\Program Files\WindowsPowerShell\Scripts\

Our next step is to then use the script to pull the device information from WMI. The information will be created and out into a spreadsheet which can then be read by the Cloud Service.

Something to add is that you need to set your restriction policy to allow you run scripts from the location of the PowerShell script.  I am on a demo machine so I set mine to unrestricted, but you probably don’t want to do that in a real world environment.  The command I ran to set my restriction policy is


Set-ExecutionPolicy unrestricted

The command format is
.\Get-WindowsAutoPilotInfo.ps1 -ComputerName <ComputerName> -OutputFile .\NameOfOutputfile.csv

If everything goes well you should now see a .CSV file with the name you chose in the location from which you ran the command. This means that the command was executed correctly and we can uploaded the device ID into the Windows Store For Business.

Something you might be thinking is how to get these device ID’s of brand new machines without booting into Windows for the first time.
The first thing to note is that Microsoft is working to make sure this manual process is almost never used. We are providing Hardware vendors the means to do this, so you never have to worry about this. However, if you do want to do this today you can do this at the very first step of the OOBE experience.
You can bring up a console at the first step OOBE by pressing [Shift + F10] and then you would can grab the script from a network share or storage device and run it. You’ll generate a .CSV file which you can then copy to another location from where you can access it. It definitely requires getting your hands dirty but with Hardware Vendors being onboarded for this process we expect our customers to not have to go through this for much longer.


Mimikatz Windows Password stealing tool

Tags

,


Hackers are using common tool for stealing the Windows NTLM Hash password by using Mimikatz. Jeff Peters made this tool to show the security threats of windows.

Now Microsoft tighten the security in Windows 10 and latest Windows  Servers . So the hackers cannot steal the password.

Here the website called varonis which is clearly mentioned about the mimikatz tool

https://www.varonis.com/blog/what-is-mimikatz/

Active Directory Group Policy rules can set in Intune for the Windows Devices

Tags

,


In Intune by using app restrictions we can set the Windows 10 devices OS end user restrict policy.

Here the Microsoft link for setting the OS restriction policy

https://docs.microsoft.com/en-us/intune/device-restrictions-windows-10


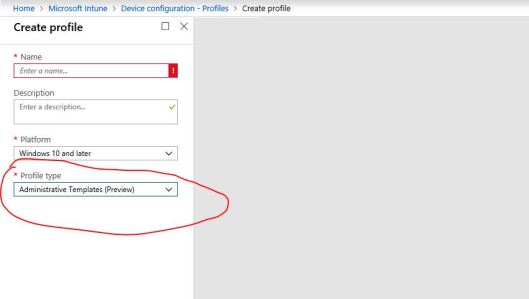
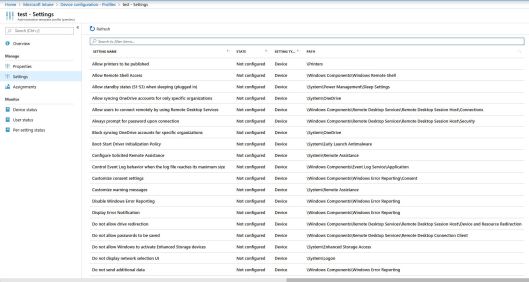
For configuring the Group Policy profile we need to come to Device configuration and select the profile type Administrative templates there we can configure Group policy for the windows 10 devices.


Now Complete End user devices profile irrespective of IOS ,Android or Windows  can create in Intune Device Configuration

https://blog.hametbenoit.info/2019/01/14/intune-group-policy-is-coming-in-intune-preview/#.XRTkT_ZuKUk

https://blog.hametbenoit.info/2019/01/14/intune-group-policy-is-coming-in-intune-preview/#.XRTkT_ZuKUk

Microsoft first Middle East Datacenter open in UAE

Tags

, , ,


Microsoft has open its first Middle East Datacenter in UAE . Now the customers can create VM by selecting the UAE North location in Azure portal which is Dubai.

https://news.microsoft.com/en-xm/2019/06/19/microsoft-cloud-datacenter-regions-now-available-in-the-uae-to-help-fuel-the-middle-easts-future-economic-ambitions/Read the Press news from Microsoft for the new datacenter

How to uninstall old Intune Client from Windows 7 and Windows 10

Tags

,


Now we don’t require Intune installer in our windows 7 or windows 10 client. It will automatically connect to intune once is joined to Azure AD. If the system already has Intune client it will not allow this system as MDM. So we need to uninstall this client

Here i am introducing batch file which can completely delete the Intune installed file from your PC. Just copy this contents  and save in Notepad and save as batch file it will automatically remove all the files.


wmic product where name=”Microsoft Endpoint Protection Management Components” call uninstall
wmic product where name=”Microsoft Intune Notification Service” call uninstall
wmic product where name=”System Center 2012 – Operations Manager Agent” call uninstall
wmic product where name=”Microsoft Online Management Policy Agent” call uninstall
wmic product where name=”Microsoft Policy Platform” call uninstall
wmic product where name=”Microsoft Security Client” call uninstall
wmic product where name=”Microsoft Online Management Client” call uninstall
wmic product where name=”Microsoft Online Management Client Service” call uninstall
wmic product where name=”Microsoft Easy Assist v2″ call uninstall
wmic product where name=”Microsoft Intune Monitoring Agent” call uninstall
wmic product where name=”Windows Intune Endpoint Protection Agent” call uninstall
wmic product where name=”Windows Firewall Configuration Provider” call uninstall
wmic product where name=”Microsoft Intune Center” call uninstall
wmic product where name=”Microsoft Online Management Update Manager” call uninstall
wmic product where name=”Microsoft Online Management Agent Installer” call uninstall
wmic product where name=”Microsoft Intune” call uninstall
wmic product where name=”Windows Endpoint Protection Management Components” call uninstall
wmic product where name=”Windows Intune Notification Service” call uninstall
wmic product where name=”System Center 2012 – Operations Manager Agent” call uninstall
wmic product where name=”Windows Online Management Policy Agent” call uninstall
wmic product where name=”Windows Policy Platform” call uninstall
wmic product where name=”Windows Security Client” call uninstall
wmic product where name=”Windows Online Management Client” call uninstall
wmic product where name=”Windows Online Management Client Service” call uninstall
wmic product where name=”Windows Easy Assist v2″ call uninstall
wmic product where name=”Windows Intune Monitoring Agent” call uninstall
wmic product where name=”Windows Intune Endpoint Protection Agent” call uninstall
wmic product where name=”Windows Firewall Configuration Provider” call uninstall
wmic product where name=”Windows Intune Center” call uninstall
wmic product where name=”Windows Online Management Update Manager” call uninstall
wmic product where name=”Windows Online Management Agent Installer” call uninstall
wmic product where name=”Windows Intune” call uninstall


After copying this file to notepad and save as batch file and run on the pc which has intune client installed. It may take sometime to remove.

After running the batch file you run the below command in command prompt for removing the complete folder.

“rd /s /q %ProgramFiles%\Microsoft\OnlineManagement”


FTP Server setup in Azure VM

Tags


FTP Server setup in Azure File server for copying files from on premise to Azure VM.


Below are the setup file.


Reference links

http://www.iis.net/learn/publish/using-the-ftp-service/configuring-ftp-firewall-settings-in-iis-7

http://fabriccontroller.net/blog/posts/passive-ftp-and-dynamic-ports-in-iis8-and-windows-azure-virtual-machines/

http://itq.nl/walkthrough-hosting-ftp-on-iis-7-5-a-windows-azure-vm-2/

http://blogs.msdn.com/b/mast/archive/2013/12/13/setting-up-a-passive-ftp-server-in-windows-azure-vm.aspx

Other method of copying files

http://www.online-tech-tips.com/software-reviews/tools-for-copying-many-files/


Installing FTP service on a Windows Azure VM

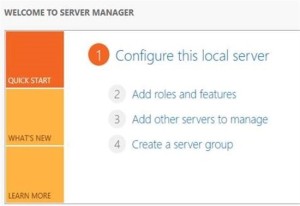
  1. Open Server Manger and click Add roles and features.
1

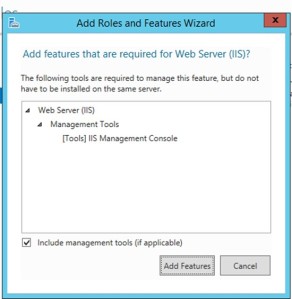
  1. From Installation Type tab select Role based or feature-based installation and click Next.        3. From Server Selection tab select the server on which you want to enable FTP and click Next.        4. From Server Roles tab select Web Server (IIS), you will be presented with the Add Roles and Features Wizard.Click Web Server (IIS) and then click Add Features.
2


  1. Click Next on the Features and Web Server Role (IIS) tabs.
  2. From Role Services tab select FTP Server and FTP Service and click Next.  

 3

  1. From Confirmation tab click Install and wait for the installation to complete.

Adding the FTP site to IIS Manager

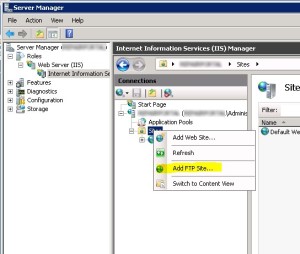
  1. From the Control Panel> Administrative Tools open the IIS Manager.
  2. From IIS Manager, in the Connections pane, expand the Sites node in the tree, then right click the Default Web Site.
  3. Now click Add FTP Publishing.
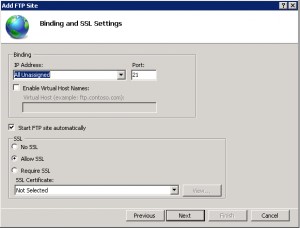
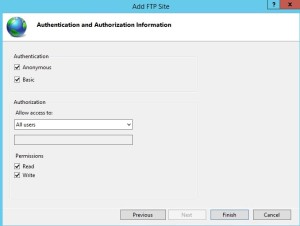
  4. Fill the Add FTP Site dialog box as shown in the below figures and click Finish.


When you’re in, you need to configure IIS. A summary of the required steps:
4

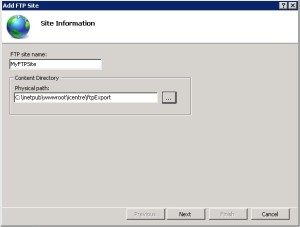
Specify the name and the local path for the site:
5

Specify binding and SSL information:

If you do not want SSL you can select NO SSL.
6


And finally specify who should have access to the FTP site. Note that I selected Basic Authentication and the all users..When you do not use SSL to secure access to the FTP site, your FTP credentials are sent in cleartext when logging in to the FTP site.

If you do not want Anonymous authentication you can uncheck the anonymous authentication.
7


Configure the Passive Port Range for the FTP Service

In this section, you configure the server-level port range for passive connections to the FTP service. Use the following steps:

  1. Go to IIS 7 Manager. In the Connections pane, click the server-level node in the tree.
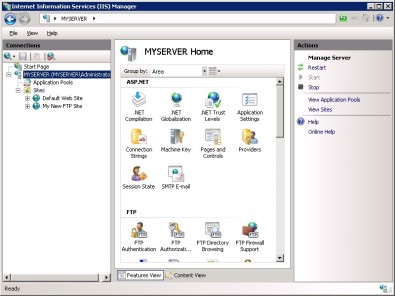
8

2.    Double-click the FTP Firewall Support icon in the list of features.
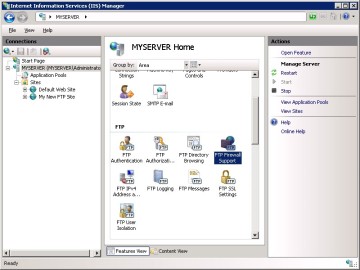
9


  1. Enter a range of values for the Data Channel Port Range.
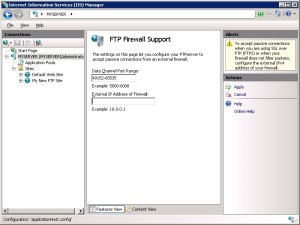
10

  1. Once you have entered the port range for your FTP service, click Apply in the Actions pane to save your configuration settings.

Notes:

  1. The valid range for ports is 1024 through 65535. (Ports from 1 through 1023 are reserved for use by system services.)
  2. You can enter a special port range of “0-0” to configure the FTP server to use the Windows TCP/IP dynamic port range.
  3. This port range will need to be added to the allowed settings for your firewall server.

Step 2: Configure the external IPv4 Address for a Specific FTP Site

In this section, you configure the external IPv4 address for the specific FTP site that you created earlier. Use the following steps:

  1. Go to IIS 7 Manager. In the Connections pane, click the FTP site that you created earlier in the tree,
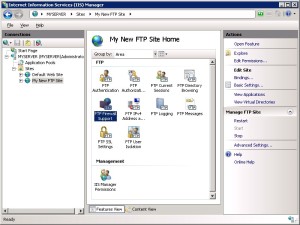
11

  1. Enter the IPv4 address of the external-facing address of your firewall server for the External IP Address of Firewall setting.
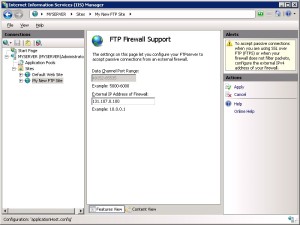
12.


  1. Once you have entered the external IPv4 address for your firewall server, click Apply in the Actions pane to save your configuration settings.

Summary

To recap the items that you completed in this step:

  1. You configured the passive port range for your FTP service.
  2. You configured the external IPv4 address for a specific FTP site.


  1. Click Apply. You will be prompted to configure the firewall to allow FTP access.
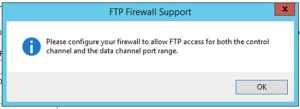
13


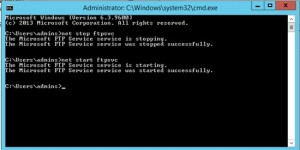
  1. To make sure that FTP server has taken all the setting we added, let’s stop and start the FTP service.

    Note: iisreset does not restart the FTP service as it is outside the IIS.  
14


Configure Windows Firewall Settings

Windows Server 2008 contains a built-in firewall service to help secure your server from network threats. If you choose to use the built-in Windows Firewall, you will need to configure your settings so that FTP traffic can pass through the firewall.

There are a few different configurations to consider when using the FTP service with the Windows Firewall – whether you will use active or passive FTP connections, and whether you will use unencrypted FTP or use FTP over SSL (FTPS). Each of these configurations are described below.

Note: You will need to make sure that you follow the steps in this section walkthrough while logged in as an administrator. This can be accomplished by one of the following methods:

  • Logging in to your server using the actual account named “Administrator”.
  • Logging on using an account with administrator privileges and opening a command-prompt by right-clicking the Command Prompt menu item that is located in the Accessories menu for Windows programs and selecting “Run as administrator”.

Note: While Windows Firewall can be configured using the Windows Firewall applet in the Windows Control Panel, that utility does not have the required features to enable all of the features for FTP. The Windows Firewall with Advanced Security utility that is located under Administrative Tools in the Windows Control Panel has all of the required features to enable the FTP features, but in the interests of simplicity this walkthrough will describe how to use the command-line Netsh.exe utility to configure the Windows Firewall.

Using Windows Firewall with non-secure FTP traffic

To configure Windows Firewall to allow non-secure FTP traffic, use the following steps:

  1. Open a command prompt: click Start, then All Programs, then Accessories, then Command Prompt.
  2. To open port 21 on the firewall, type the following syntax then hit enter:

netsh advfirewall firewall add rule name=”FTP (non-SSL)” action=allow protocol=TCP dir=in localport=21

  1. To enable stateful FTP filtering that will dynamically open ports for data connections, type the following syntax then hit enter:

netsh advfirewall set global StatefulFtp enable

Adding ports specified in the previous step as endpoint to the VM

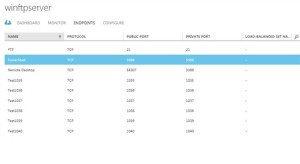
Ports 1035 to 1040 should also be added as endpoint to the Azure VM. You can add multiple ports as endpoint to the VM using Windows Azure PowerShell. Detailed procedure here.


You can also add endpoints using the management portal. Detailed procedure here.


To confirm that the said ports are added to the VM, please check the endpoint list on portal for the said VM.

Note: You also would need add port 21 to the endpoint list which is command port for FTP connection.
15


Adding Firewall rules to allow traffic on the added endpoint

For ports added as endpoints in the above procedure, no configuration is done automatically to the firewall in the guest operating system. When you create an endpoint, you’ll need to configure the appropriate ports in the firewall to allow the traffic you intend to route through the endpoint.


In this case I have disabled the Windows firewall for simplicity. You can refer here to modify the firewall rules to allow traffic on the ports added as end points.


We are now done setting up the passive FTP Server on a Windows Azure VM.


Verifying that FTP server is using the port previously specified under data channel port  


  1. Client connects on the command port, which is usually TCP port 21.
  2. When the connection on command port is successful, the server sends a port to the client to connect to. If you are using FileZilla, you will see something like this: Command:        PASV Response:        227 Entering Passive Mode (168,63,240,169,4,14). Where 168,63,240,169 is the IP address of the VM and 4,14 is the port on which the data traffic is routed (256*4+14=1038). This is how you determine that a port added in previous steps are actually being used to establish a passive FTP connection.


Points to consider from Azure SLB perspective


When FTP is transferring large files, the elapsed time for transfer may exceed 4 minutes, especially if the VM size is A0. Any time the file transfer exceeds 4 minutes, the Azure SLB will time out the idle TCP/21 connection, which causes issues with cleanly finishing up the FTP transfer once all the data has been transferred.


Basically, FTP uses TCP/21 to set everything up and begin the transfer of data. The transfer of data happens on another port. The TCP/21 connection goes idle for the duration of the transfer on the other port. When the transfer is complete, FTP tries to send data on the TCP/21 connection to finish up the transfer, but the SLB sends a TCP reset instead.


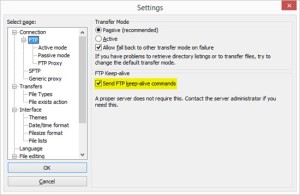
The way around this is to make the client to keep the TCP/21 connection from going idle. If using a 3rd party FTP client, there may be configuration knobs the user can turn in order to cause the FTP client to send a keepAlive. As an example of how you can set this in FTP client software, in FileZilla, you go to Edit, Settings, Connection, FTP, and check Send FTP keep-alive commands.
16

If the FTP client is being written in .NET, customers will need to account for this client-side keepAlive in their code. Here is a sample (the keepAlive is highlighted):


Sharing Folders in Azure VM

Tags

, ,


Courtsey: MSDN Blogs  Blogs MSDN-2

Download robocopy for windows 2003 server for file server migration to azure with same permission


Configure the Virtual Machine File Server

Utilize the following procedure to configure a Windows Azure Virtual Machine (VM) instance for use as a File Server.

  1. Create the File Server VM instance (e.g. “MyFileServer.cloudapp.net”) using the Windows Azure portal.   See reference instructions here.
  2. Attach and format a blob-storage hosted data-disk to the VM.
  3. Once the File Server instance is running, configure a limited privilege user-account (e.g. “MyUser”).   Note that this service account is a primary security mechanism for the server instance.  Any other VM within the data-center could access your server or cause denial of service.   More advanced server security configuration is beyond the scope of this article.
  4. Using the Server Manager Console, enable the File Server Role.
  5. Create a File Share folder (e.g. “MyShare”) on the attached data-disk and enable read/write access for the MyUser account.
  6. Add two endpoints to the VM for both TCP port 445 and UDP port 445.   This enables the server (at the service deployment level) to communicate SMB protocol with worker-roles hosted in the same Windows Azure data-center.   The SMB protocol is not currently routed externally from the data-center.

Your File Server configuration should appear as follows from the management portal.

MyFileServer1

With corresponding service end-points configured as illustrated.

MyFileServer2

And the file share configuration similar to the following image.

MyFileServer3

There are two options to migrate files between two server


  • Use Robocopy


Robocopy is essentially a tool for copying files from one location to another that has:


  • The ability to copy NTFS permissions, if you want to
  • The ability to skip files that have been copied previously, provided that they have not changed


For the reasons above it is still ideal for using when you want to quickly migrate the contents of a file share to a new server. To do this first set up the new file share on the new destination server, making sure the share and NTFS permissions match those that are configured on the old share on the old server.


Next enter the following command on the admin command prompt, where OLDSERVER is the old file server name, and OLDSHARE is the old share name, and NEWSERVER is the new server name and NEWSHARE is the new share name:


robocopy “\OLDSERVEROLDSHARE” “\NEWSERVERNEWSHARE” /S /E /COPY:DATS


The command basically tells robocopy to copy the contents from the UNC path of the old share, to the UNC path of the new share. The /S and /E tell robocopy to copy any subdirectories, and empty directories. In this example the /COPY:DATS tells robocopy to copy the Data, Attributes, Timestamps and Security information. There are a couple of other elements that you can also copy if you want. To copy everything use /COPY:DATSOU or alternatively /COPYALL. Here is a list of all the flags you can use with the /COPY: part of the command:


D – Data

A – Attributes

T – Timestamps

S – Security i.e. NTFS permissions

O – Owner information

U – Auditing information


Reference : Robocopy and a Few Examples : http://social.technet.microsoft.com/wiki/contents/articles/1073.robocopy-and-a-few-examples.aspx


  • Use File Server Migration Toolkit v1.2


  • To smoothly migrate the DFS root, you may consider using File Server Migration Toolkit v1.1 to migrate the DFS namespace from the old Windows Server 2003 to the new Windows Server 2008. By using File Server Migration Toolkit, we can copy shared folders, files, and their security settings from a source file server to a target file server without losing their share and NTFS security settings. It is very easy to use FSMT, which can save you lots of time and effort.


  • For more detailed information about FSMT, you may refer to the following documents.


Download: Microsoft File Server Migration Toolkit 1.2 http://www.microsoft.com/downloads/details.aspx?FamilyID=d00e3eae-930a-42b0-b595-66f462f5d87b&DisplayLang=en


Overview of the Microsoft File Server Migration Toolkit http://www.microsoft.com/downloads/details.aspx?familyid=604BE797-D19E-4BC1-A148-B48FC731135E&displaylang=en